
Get ready for a LOT of photos 🙂
Topics Discussed On This Page
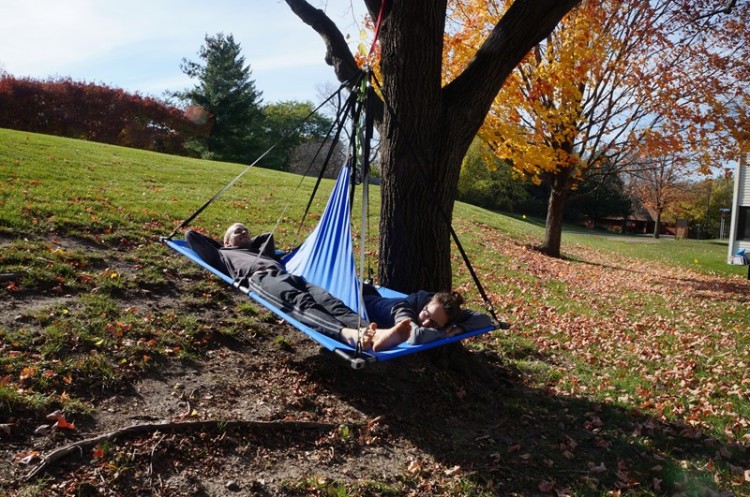
Debate: Hammock vs Portaledge vs Tent

The 15 Minute DIY Portaledge – Light & Collapsible!

The TREEfool Portaledge Of Love – A Portaledge For Two


Designing A Rainfly For Tree Camping


Where To Buy (frame tubes, custom milled corners, bedding material, etc)

The Debate
Should I revert back to camping with a tent? This was the question I recently asked myself when I realized that I simply don’t sleep well hanging in a hammock. I understand that most people who try out a hammock NEVER go back to sleeping in a tent because they find hammocks to be so comfortable. Unfortunately I just can not get used to the “hug” of a hammock and every time I sleep sprawled out in a tent I consider selling my hammock. But on the opposite side, every time I go camping with a tent I obsess over the beautiful trees that I don’t get to climb and sleep in.
In other words, I have two options: 1. go on an adventure where I have fun climbing big trees and enjoying lounging in the sky at the cost of uncomfortable sleep. 2. sleep comfortably in a tent at the cost of less adventure and boredom from a lack of climbing. In the debate of option one (hammock, fun, bad sleep) versus option two (tent, boredom, great sleep) I choose option one. So how do I resolve the issues of option one?
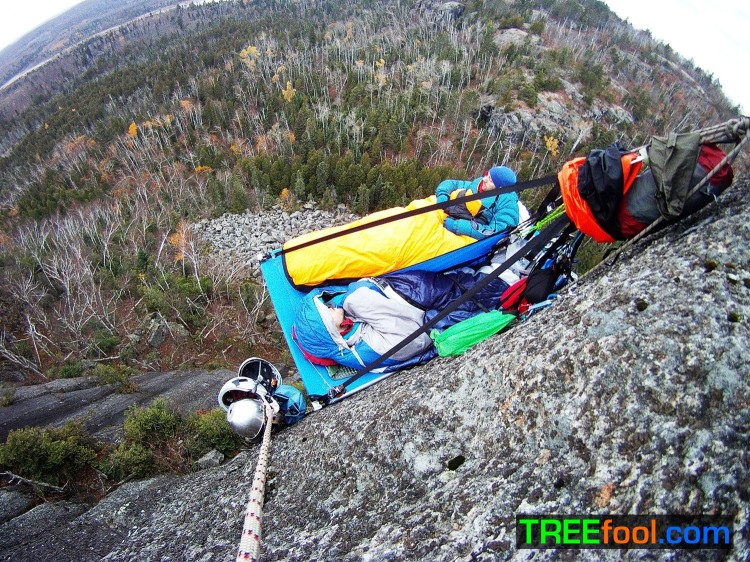
A portaledge. I love my “Monster Proof Hammock System” because I am sure I couldn’t find a lighter tree camping setup but the decision to start using a portaledge was based on ease of setup. Ease of setup directly affects tree choice, time of setup, and most importantly comfort. When hammocking up in the canopy finding a setup location that has a useable width, has level anchor points, and doesn’t have any branches impeding into the space is quite difficult. This usually results in a suboptimal setup which causes discomfort and awkward situations. A portaledge can be setup in any tree, even one without branches, and the sleeping surface is always level, roomy, and comfortable. At this time in my life sleep is very important to me so I choose to haul the extra weight for a guaranteed good night sleep.
I believe the quote is “necessity is the mother of innovation” which is why I assure you that my nearly perfect tree camping setup will eventually become lighter and lighter until it meets my strict weight standards and turns into the ultimate tree camping rig. I think breaking the five pound barrier (including ledge, bedding, rainfly, straps, and anchor) is totally possible. For now, enjoy the tutorial of my current setup!
THE 15 MINUTE PORTALEDGE – LIGHT & COLLAPSIBLE
You can build your own portaledge in less than 15 minutes. Simply follow the first four steps and you are done!
.
STEP 1
Buy a Gander Mountain Cabin Cot ($69.00). I have tried building a portaledge with many different cots with varying degrees of success. The first cot I got for free off Craigslist (see the “Junkyard Portaledge”), it worked awesome! But the main frame was only two pieces unlike the six piece Gander Mtn frame which made it very bulky to carry. The second cot was a steel frame and it weighed like 20 pounds which is ridiculous for a solo cot.


.
STEP 2
Remove the rivets. MAKE SURE TO PUT A PIECE OF WOOD UNDER YOUR CHOSEN RIVET or you will burn a whole in your floor, ask me how I know… Take a hand drill and choose a bit that is a hair smaller than the rivet. Drill from the inside toward the outside of the frame due to the shape of the rivet. The head will pop off and you can push the rivet through but sometimes it requires a tap from a hammer and nail. Only remove the four rivets connected to the frame (do not remove rivets from the middle leg).


.
STEP 3
Replace the newly removed rivets with four 1.5″ x #10 screws and four wingnuts. You can now remove the middle leg and break down the frame into six pieces. The middle leg is the seventh frame piece and is required because it acts as a spreader bar and prevents the frame from “hourglassing” and bending the tubes.


.
STEP 4
Attach the webbing. I chose to use Tape Craft 1″ Light Weight webbing. I bought the webbing from REI for $0.30 per foot. It is significantly lighter than using climbing spec webbing and more than capable of holding a single portaledge. If you made it this far you should have no problem tying the suspension but I recommend an overhand-on-bite and using this loop to girth hitch the frame. The girth hitch will tighten under the weight of your body and prevent the webbing from sliding towards the center of the ledge. I also recommend tying a piece of cord on BOTH sides of the middle leg (see picture below) which means the small bolts do not have to bear any weight. After you tie the webbing to the frame attach each of the other ends to a big locking carabiner.


DONE!!!
Seriously it is that easy. But you will notice that this suspension technique is bulky and hard to adjust for different angled trees. This is why I recommend you check out “Anchor Ideas”.
Once you finish building your ledge you will understand why I chose this specific cot. It breaks down very small! Here is a picture of it strapped to my pack.

v
TEST VIDEO
v
^
TEST VIDEO
^
This portaledge is not limited to just tree climbing. I brought it to my local crag when my partner and I were practicing multipitch techniques. I set it up 40′ off the ground and used it to belay my partner up the rest of the climb. Having a comfortable belay ledge is 10 billion times better than a hanging belay! At one point I was sitting on the portaledge and my partner asked if he could stand on it with me. I thought, “Hmm, this is just an aluminum cot built for camping on the floor. Would it be a good idea to do this?”. The smarter part of my brain said it was a bad idea but the awesomer part of my brain took over and I told my partner to do it and hope for the best! There was a lot of creaking and other weird noises but the portaledge held us both (him standing on the head end and me sitting in the middle) without spontaneously combusting!

The TREEfool Portaledge Of Love


The Junkyard Portaledge
This is what started the portaledge avalanche of ideas. Old aluminum cots make awesome portaledges because they are simple, cheap, and very light. I found this one in the outdoor section of craigslist. Price? FREE!

BUT THEN! I drove past a pile of free stuff the other day and noticed there was an old cot so I of course had to snatch it up. Like most of the old cots I have found it is a very light aluminum frame and the best part is that it FITS ME!!! It is like a gift from the gods because I could not find any cots online with an aluminum frame that were longer than 72″ (this frame was 76 inches!!!). So I ripped off the old material and built a new removable bedding for it. Check it out:


Anchor Ideas
The cheapest and easiest way to make an anchor for your portaledge is to simply tie all of the straps to a single carabiner. But as you can see from the following photo this is bulky, heavy, and non-adjustable.

Instead of dealing with that mess I recommend you buy six cam buckles and replace the included webbing with your Tape Craft 1″ Light Weight webbing. The cams can be bought at Home Depot or Menards (which has a smaller and lighter version) for about $8.00 per pair. I made this step even cleaner by purchasing three rappel rings and sewing the cam buckles in place. Less knots, less bulk, less weight.


Designing A Rainfly For Tree Camping
What is the difference between a rainfly for rock climbing and a rainfly for tree climbing? Two things: mosquito proofing and durability. In big wall rock climbing a rainfly is only used in bad weather as a last resort. There are no mosquitoes 1000 feet up a rock wall unlike climbing in a forest where mosquitoes are ever present. For this reason tree portaledges need big mesh windows to handle the condensation build up that occurs from having the rainfly deployed at all times. And as for durability, tree bark is much nicer than sharp granite rock so materials such as ultralight 30d silnylon can be used as opposed to 200d oxford which is the standard for rock climbing.
I stealth camp for most of my tree camping trips because where I live there are many forests with beautiful unclimbed trees where I dont have to worry about noisy RV’s, dogs that bark all night, or piles of beer cans from drunken idiots. The following tarp was developed for my main ultra light stealth camping portaledge so I chose to order five yards of 30d Silnylon in dark brown (I recommend buying from BearPaw over Seattle Fabrics).
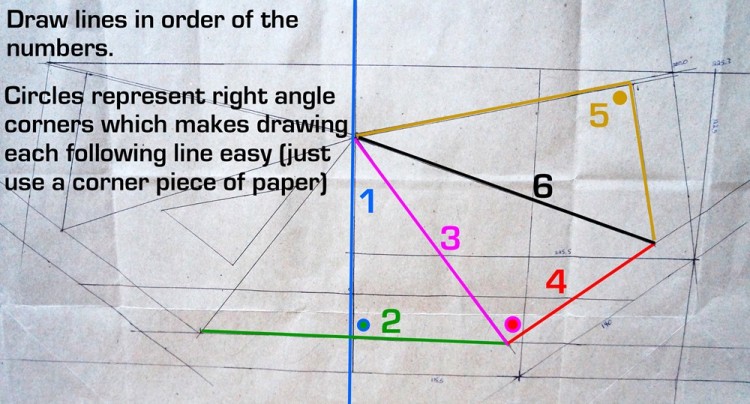
This tarp is VERY easy to make. If you graduated highschool and own a sewing machine then you will have no problems. I followed a very old tutorial by The Wall Pirate at this link http://taiwanrock.50webs.com/pirate_portaledge_rainfly.html. I thought his tutorial was perfect but then this happened:


BUT DO NOT WORRY! You will not screw up like I did. You will not waste TWO WHOLE FREAKING DAYS trying to solve a geometry problem like I did. Just remember this: the top line in his diagram will NOT be straight. The following diagrams should help you understand how to easily draw your own pattern. I recommend you draw a scaled replica onto a large piece of paper. So 10cm on your final product will equal 1mm on your replica pattern. You can then use this scaled down version to order the correct amount of fabric.


.
In the following picture draw line #5 by using a corner on a piece of paper. Measure the two required lengths from the corner out ward. After you have completed this “mini pattern” use it to draw the third right angle in the correct spot on your diagram.
.
Measure and cut your fabric!


.
Sew the top outside corners together towards the middle. Just one straight line! Keep the stitches tight so that you can seam seal it with just a small amount of sealant. The hole will be covered by the top cap.

.
OPTIONAL:
I recommend you add a small strip of webbing at the top BEFORE sewing the two corners together. This will make the stitches at the top less prone to ripping the material.


Add a window. The tarp will be a fully enclosed doorless sauna without a window so it is important to make the window VERY big. On the tarp for my solo portaledge the window takes up roughly 50% of the airside of the rainfly. On the tarp for my double portaledge (see below) I actually used two large windows with the hopes that air could flow through and lessen the condensation that two sweaty climbers create.


The Best Topcap Solution
.
Now we have to cover that big hole with a top cap! I wanted a 100% waterproof build so I chose to copy Metolius’s design.
I bought a big bar of – inch wide x – inch thick aluminum from Menards and a 3/4 inch drill bit ($20!) and began the testing process to make sure the aluminum was strong enough. At one point my wife was upstairs and she screamed “LOGAN WHAT IS HAPPENNING!” because apparently the bathroom was flexing up and down due to my top secret testing processes happening two stories below. The aluminum test piece survived with no noticeable damage even though it saw static and dynamic loads much higher than what I will produce when hanging from it on my ledge. Still, I decided to play it safe by remaking the plate with – inch thick sides and using two plates for a totally worry proof anchor.
I cut my plates to – inch x – inch with a jigsaw but you can use a hack saw if you don’t own many power tools. I left 1″ extra at the end for clamping purposes which is cut off after all holes get drilled. I drilled the 3/4″ holes with a handrill but would have loved to have a drill press to keep the holes perfectly centered. Hand drill tip: drill a hole into a piece of wood and clamp it to your aluminum plate to prevent the drill bit from wobbling off center.


.
Cut two single hole outer plates. Clamp all four plates together and drill four – inch holes for the screws that will hold the plates together.

.
Sand the shit out of every corner! If you are using Silnylon like me even the smallest bur could tear a hole in your material.


.
Draw up, cut, and sew your top cap. The circumfrance and height is determined by how low the hole on your tarp is. I recommend sewing a topcap that is folded at the top (as opposed to sewn) in order to improve waterproofness and lessen the need for seam sealer.

.
Insert the plates into your top cap and use a nail heated over a flame to pierce holes. Make sure you don’t make holes in your tile floor (ask me how I know that). Bolt everything in place then take an old knife and heat it up over the flame to cut out the main hole. This works as good as cutting through human flesh with a light saber, haha. In other words, it works very well.


.
Optional
I had some extra 500D polyester laying around so I cut a few small squares to protect the silnylon from any sharp edges I may have missed with the file.


Where To Buy Portaledge Materials
I am not exaggerating when I say that this list took me MONTHS to compile. A lot of research, (do not underestimate “a lot”) went into finding out what materials, tubing thicknesses, hole diameters, and corner connectors are used on traditional portaledges. Seriously guys, if you use this list for future articles or projects I would appreciate if you referenced TREEfool.com for helping you find the materials. Thanks!
Portaledge Manufactures & Material Specs
Metolius Double Portaledge = 3’9″x7′ – 13lbs 12oz – $750 – 1.125″ 6061 aluminum triple butted
Black Diamond Double Portaledge = 4’3″x6’9″ – 19lbs 13oz – $700 – 45mm double butted 6061 aluminum
Runout Custom Double Portaledge = 3’6.5″x6’3″ – 9.12 lbs – $675 – 1.125″ 6061 aluminum
Fish Double Portaledge = 6’5″x3’7 – ?lbs – $990 (fly included) – 7/8″ 4130 chromoly
Corner Pieces
eMachineShop.com = they have a free CAD software program that you can design any aluminum corner out of 6061 aluminum for a price that usually starts at $50 per corner but decreases with the higher number of orders. (Let me know if you are interested in a group buy and we could get them for around $15 each!)
RunOutCustoms.com= this guy is awesome. I learned a lot from his research and he was cool enough to sell me some old corner pieces that he had left over. They only fit 1″ OD tubing so this limits your tubing choice greatly (1″ aluminum is too skinny, 1″ chromoly is too heavy). If you ask politely he may be able to help you out.
Tubing
OnlineMetals.com = There is no need for another option because this seller is great. They have aluminum, chromoly, titanium, and many other materials. Tubing sizes and wall thicknesses are seemingly limitless. Shipping prices are fair. Descriptions are superb (OD and ID measurements listed to the thousandths!)
Tips:
– Buy “tubing” not “pipe”
– 6061 aluminum is the best priced aluminum
– 1.125″ aluminum tubing with .058″ wall diameter (1.009″ ID) fits perfectly over 1″ tubing and has great strength to weight ratio to use as main tubing or as a connector piece over 1″ tubing
– 1″ cold roll 4130 chromoly is a much more durable and stiff choice than 1″ aluminum. Use a wall thickness of .035 because anything more will be way too heavy.
Fabric
bearpawwd.com = These guys sell the cheapest 30d silnylon I could find although their color options are limited relative to the competition. They are my favorite to buy from because they’re a small company that has great service.
seattlefabrics.com = Most DIYers are familiar with Seattle Fabrics. I only use this company when I need a rare fabric color.
rockywoods.com = I bought my 400D packcloth from these guys due to their variety of colors and because the sold the specific plastic buckles that I wanted.
Anchor Cam Buckles
HomeDepot = These buckles have a weight rating listed on the package. They are sold with green webbing in packages of two. Don’t use the webbing. Weight is 1 ounce each. ~$7 for two
Menards = These buckles also come in a package of two but with black webbing. They are bulkier and twice the weight of the first option. They have weight ratings on package. ~$8 for two
Seattlefabrics.com = They sell individual metal cam buckles but no weight ratings are listed. $2.50 per buckle
RipstopByTheRoll.com = I think these guys are the newest online fabric dealer. They have become my favorite place to shop for many good reasons. Awesome prices, unique fabrics, and an easy to use platform.
Please ask me any questions you may have about building your own portaledge and rainfly.
.
.
.
Tags: TREEfool , portaledge , how to build a portaledge , how to make a portaledge for climbing , diy portaledge how to , how to build a portaledge for under $100 , MYOG portaledge , make your own portaledge , home made portaledge , portaledge blueprints , portaledge versus hammock debate
Reader Submitted Portaledges:


awesome- really dig the effort into making a piece of gear do what you want and how you want +keeping the weight as a factor. nice job
Thank you! I learned a lot from this project and plan on using the knowledge to build version 2.0 AND a double ledge!
This kind of camping is my dream camping trip. Thanks for all the tips and I can’t wait to slay some dragons 🙂
I will be patiently waiting for pictures of your first slain dragon!
How much does the Gander Mountain Cabin Cot and the one you found on the street weigh?
See the answer to this question in my previous comment.
What is the weight of the Gander Mountain cot and the cot you found on the street?
The Gander Mountain Cot weight is 5 pounds 6 ounces. This is the final weight which means it includes the added bedding side material and excludes the factory head and foot legs. The webbing and buckles adds an extra 1 pound and 5 ounces. I currently do not have access to my scale to measure the weight of the free cot I found but the frame will likely be significantly lighter since it is a two piece vs a six piece design. Once I finish my current project I will measure final weights and post a weight list of each piece of the two portaledges.
Thanks!
Hi ! I am a really fan of your work ! And if you’re comming in France, please let me know ! I’ll organize an expedition, I personnally know some trees !
I have some interrogations, how can you be sure that your cam buckles (strap) will resist ? That system seems a bit fragile … no ? (speacking about buckles)
I wonder what kind of sewing machine do you use ? I was asking some haberdashery, they said I need a special one because straps are thick … Then I didn’t understand what she said… Maybe about the motor of a standard machine won’t be able to pull the strap…
And just in case, maybe you coud help me. I would like to climb some trees with a minimum gear. I have my gear for climbing but I ‘m speacking about while I’m walking and I want to have a spot for photography or just for fun… not high maybe 10 feets. I though about a paracord ladder but too many cord in the pocket.
So I’m trying to create a stick multi-use. walking stick, trapeze, (blowpipe), monopod for photo.
The first idea was to have a bar every time with me. Then I throw my paracorde over the first branch, I attache the stick and I climb like a trapeze. It is a one step ladder.
My problem is to have something light, easy to care => no bag. Resistant because I don’t wanna the stick break when i’m on.
An idea ? the material to use for the stick ? or maybe not a stick ?
Bye ! hope see some new adventure soon !
Bonjour! My wife and I would love to visit France and we have even been trying to learn a little bit of French but without a proper teacher it is quite difficult. Anyways, to answer your questions…
I purchase the cam buckles in a box that lists a weight rating. Each buckle is rated to 150 lbs (68 kg for you guys on the other side of the ocean) with a breaking strength of 450 lbs (204 kg). So six bucks multiplied by 150 lbs is 900 lbs (408 kg). Since I only weight 164 lbs I am not too worried about them breaking. And if they do break, I am always tied into an anchor that is rated for climbing.
The straps I use are actually “tape” (this is confusing even if English is your primary language) which is much thinner than “webbing”. The tape is rated to 1,650 lbf, here is a link:
http://www.rei.com/product/857934/tapecraft-1-lightweight-nylon-flat-webbing#descriptionTab
I can not use tape for actually climbing purposes but it is plenty strong to hold up my portaledge since I am of course always tied into an anchor rated for climbing. This tape can be sewn through with a standard sewing machine. My wife’s sewing machine never has any problems sewing through it. However, “webbing” that is rated for climbing is much more difficult to sew through and gives my sewing machine problems.
I am having a difficult time understanding your final question. I assume your idea was difficult to translate but from what I understand is you will have a walking stick which is made out of aluminum and shaped like the letter “L” with a piece of paracord tied to the top. You can toss the parachord over a branch then stand on the bottom of the “L” shape, is this correct? Maybe if you draw a picture it would be easier to understand.
Bonjour !
Happy to see that France is still attractive ! Whenever you come don’t hesitate to contact me ! I’ll be happy to take a drink or indicate you some places.
I’m sorry, I’m not a good teacher but if you want a french native to talk there is no problem.
For the sewing machine, the size of the tape certainly make the difference.
For the last question, excuse my english, I’ll try to be more understandable…
The situation : I’m walking, I’m not able to reach the first branch of a tree.
My current technic is : throw a paracord over the branch. Then I tie a piece of wood found in the forest in order to make a trapeze. Then I climb on the trapeze and then the branch.
Problem : sometimes the tree is not in the forest and so there is no piece of wood to make my trapeze…
I’m searching a way to replace the piece of wood by something I could have at anytime on me.
I won’t take a steel tube on walk only to make my trapeze. Make this trapeze is occasional, So it has to be useful for other reasons. That’s why I want it multi-use, walking stick, monopod for photography…
Do you have an idea of what material should I use ? Light and resistant. Or maybe a complety different way to climb on tree without gear (or a minimum) ?
Bye ! It is really late for me so I’m gonna sleep !
Ok, I think I understand what you are trying to accomplish. Why not just use a collapsible hiking pole? As long as you tie the “trapeze” so that the standing area is not much wider than your foot I’m sure a hiking pole will hold your weight fine. Is there a reason why you can’t just bring 20 feet of paracord and tie a loop in one end to stand on? It will squeeze your foot when you stand in it but this would be a non-bulky way to step up to a tree branch. I like your minimalist approach to climbing but I agree with Andrew that bringing a small day pack would be a lot more helpful in this scenario. If you had a backpack you could easily carry a paracord ladder or a hasty harness with prusiks and a small rope.
Hi Logan! What is set up time of your current gear compared to your old hammock?
2 Dxmxtrx – I found that with a few meters (2 x height of lowest branch) of 8mm rope, two loops for prussics and harness I could enter most trees nearby. The system is light (about 1 kg.) and could easy fit into a day pack.
Andrew, that depends what you consider part of the setup time. If I was standing on the ground with three perfectly spaced trees I could take my hammock from the stuff sack to fully set up in less than a minute. If I was standing on the ground by a tree to hang my portaledge it would likely take about five minutes to insert the frame pieces into the bedding, screw the frame pieces together, tie the webbing to the frame, and toss on the rainfly. The most time consuming part is holding the frame together while inserting the screws and wingnuts. In this scenario the hammock is much faster.
If I was climbing up into the tree canopy setting up a hammock is much more time consuming because finding a location usually requires technical traverses and temporary climbing anchors to reach the outer branches of the tree. This usually can not be accomplished in less than 20 minutes but it really varies by tree. With a portaledge, once it is put together I simply clip it to any anchor point and setup is complete. Easy!
The third scenario is called flagging. This is a rock climbing term where the portaledge is never broken down into pieces. This means I will just fold the ledge in half with the webbing still attached and hang it on the outside of my pack. Setup requires that I simply remove it from my pack, and clip it to my anchor point. This would take 10 seconds? This option is of course very bulky to hike with though.
Do you assemble the portaledge on the ground and then move it up or you do it on a tree top?
Andrew I have yet to assemble any of my portaledges while hanging in a harness. I am waiting for my order of shock cord to install inside the tubes which would prevent me from accidentally dropping a piece. Once I get the shock cord installed I will see how difficult a portaledge is to assemble while climbing!
Hi, first congratulation for the project, you are amazing! I am tring to build my portaledge, i have some question: ( sorry for my english, i am italian and i dont speek very well)
-I dont uderstand the diameter and the tickness of the tube for the main structure.
– what type of fabric did you use for the bed? I cant find in my city a good fabric and on internet i can’t uderstand wich one i have to buy beacuse i can’t touch it fisically.
-Last thing what are the size and the weight of your DIY portaledge?
Thank you so much
Federico
Federico, I wish America used the meteric system but we do not. The measurements are in inches. So 1″ = 1 inch. You may want to use google to convert to the meteric system. OD = outer diameter (measured from one side of the tube to the other side through the center line). ID = inside diameter. The main tubes have a one inch outer diameter while the connecting tubes have a one inch inner diameter which means the connector tubes fit perfectly over the main tubes.
The material that I used is a 400 denier packcloth with a waterproof coating. Most manufactures use 420 denier packclothe like you can find on this link http://seattlefabrics.com/nylons.html#fpc
Any cloth above 400 denier should be plenty strong. If you own a heavy duty backpack made for climbing just feel the material and use that to guage the material you need for your portaledge. You will likely not be able to source this material locally and will have to order it online.
The finished size of my double portaledge is 84 inches × 38 inches. I havent weighed it yet but will post that information soon.
Sorry i post on the wrong page i am reffering to the double portaledge!
Hey,
Thanks so much for sharing all of this with such enthusiasm! I’m getting really excited about ordering materials and starting on making some of your ideas this week. I was wondering if you ever posted the diagram for your rainfly. I’m looking at wallpirate’s tutorial now and just wanted to get my head wrapped around the whole process before ordering materials. If you’ve already posted this diagram somewhere, would you mind pointing it out to me? Sometimes I’m just rather good at overlooking stuff. Thanks again and if you have any words of wisdom for someone trying this out for the first time, please share!
p.s. if you have any tips for keeping water from freezing during extended winter camping and or suggestions for low cost and safe heating of tents for extended stays in subfreezing conditions, that would be greatly appreciated too!
Thanks for the reminder! I spent an hour today updating this page with the rainfly diagrams and instructions. My best tip when building your rainfly is to draw out your design in a smaller scale before you do any ordering of materials. In fact, draw it out two, three, or even four times, cut it out, and fold it to make sure you made the correct measurements. Once your design looks good in a small paper model it is time to do the real deal!
As for cold weather tips, I think you have given me a great idea for my next video! But until then: keep your water from freezing by either carrying it inside your jacket (I no longer do this because it is uncomfortable), store it in your backpack wrapped in your main insulation layer (it should stay thawed all day in 0* temps like this), buy a Nalgene coozie ($20 for an Outdoor research coozie which does the same thing as wrapping your bottle in a jacket), sleep with the bottle inside your bag (sometimes you can leave it squished between two ppl), OR boil it just before bed then stick the bottle in your boot and you will have warm boots in the morning! I have considered titanium wood burning stoves for tenting in the winter with my wife but it is MUCH easier to just by a thick belay jacket and puffy pants to snuggle in when playing around camp. These clothes will be far too warm to hike in but will be perfect for sitting around cooking food. This is definitely going to be my next video topic! Hope this helped!
Hey there,
Love the tutorials and videos! Very much inspired me to make my own portaledge as well been thinking about it for a while.
I had a little query as to thickness of Aluminium tubing used for the frame. We use SWG here in England 14 SWG = 2.032mm (0.080″) and 12 SWG = 2.642mm (0.104″)
Which thickness did you spring for if either? It’s a toss up between weight and rigidity (and price). Im hoping to avoid a spreader bar, such a pain after hours climbing, so It’ll probably be the 12 SWG but having no metal knowledge thought you could help.
Keep up the good work
Ben, I thought I went into greater detail about the tubing thicknesses but apparently I forgot to post the research I found on this topic. At this time I have forgotten the exact thicknesses of all the different size tubes that work but the following is a quote from above that I wrote to assist you guys in finding a great place to buy tubing:
“OnlineMetals.com ..this seller is great. They have aluminum, chromoly, titanium, and many other materials. Tubing sizes and wall thicknesses are seemingly limitless. Shipping prices are fair. Descriptions are superb (OD and ID measurements listed to the thousandths!)
Tips:
– Buy “tubing” not “pipe”
– 6061 aluminum is the best priced aluminum
– 1.125″ aluminum tubing with .058″ wall diameter (1.009″ ID) fits perfectly over 1″ tubing and has great strength to weight ratio to use as main tubing or as a connector piece over 1″ tubing
– 1″ cold roll 4130 chromoly is a much more durable and stiff choice than 1″ aluminum. Use a wall thickness of .035 because anything more will be way too heavy.”
-end quote
Ben, since you are in England you will likely have to find a local company that lists weights and prices of local aluminum. I will try to find my notes that compares ALL of the tubing “SWG”. Notice that I chose to use 1″ chromoly (steel, not aluminum) for my main tubes. If you want to use aluminum tubes a 1″ outer diameter is just too skinny for aluminum and you will need a spreader bar. If you step it up to 1.125″ outer diameter tubing you can get by without a spreader bar if you keep the size of your portaledge small. I chose 1″ OD tubes so that I could use the connecting tubes on the OUTSIDE of the main tubes (and simply keep the connecters from sliding out of place using a piece of thick tape) instead of have the connecter tubes on the inside of the main tubes which would require a rivet to keep the connecters from sliding on the inside.
I hope this helps for now. I will look for my wall-thickness notes.
Cool stuff man. I’m getting ready to make a portaledge using your website. Im looking forward to trying it out. How long is the webbing that connects the cot to the anchor point?
You can forget that last post I made. I realize why the straps need to be adjustable. I think I’m going to use tubular webbing and tie a beer knot or water knot until I understand the methods of sewing webbing. Have u ever used tubular webbing a cam buckle?
Yes, I have used tubular webbing in cam buckles. I thought tubular webbing was needed for safety reasons until I realized that the buckles were the weakest link even when used with tape webbing and since tape webbing is a lot lighter than the tubular stuff that is all I use. Depending on the cam buckle tubular webbing will be a very tight fit but it should work! My first portaledge I didn’t even use cam buckles, I just tied a hole bunch of water knots, haha.
As for the length of the webbing it varies based on many things. My double portaledge is 4.5 feet from the meeting point of the webbing down to the ledge frame (measured down the wall-side center strap). This does not consider the extra 3 or 4 feet you would need to add for tying knots. The five other straps will be even longer since they have a further distance to travel from the top point down to the corners. I would give you specific numbers but they vary depending on the size of your frame.
Well, I’ve got the webbing ordered…50 ft of it…If it’s enough, good! if not, I’ll just have to order more and have to wait…uhhhh..
I thought about using 8 or 9 mm climbing grade cord and running it through the rings at the top to come back down on itself with a prusik or a climbing hitch. I’ll figure something out and show it to you when I get finished.
On another note, I think it would awesome to set up the ledge with some pulleys in a 3-1 leverage system with a climbing knot so that after you got to the top and set everything up you could lower and raise yourself. The rain fly throws it off for me though b/c with the way I know how to set that up, it would be directly over the center point of the ledge. That I’ll have to mess with after I have it built. Thanks for the directions man. When I get finished and I show it off on FB, I’ll plug your site.
I am glad I could help and thanks for the plug! 50ft of webbing is usually how much I buy so you should be fine. I definitely would like to see your finished ledge especially if you rig up a 3-1 pully. Ha, that would be awesome and I like the way you think!
Hey there again treefool, I made some progress on my ledge and as I’m planning my rainfly/bug net I’m trying to figure out how to keep it from coming into contact with my head and feet. Unfortunately I didn’t forsee that and I’m left to improvise now. I thought about connecting some tent pole type rods parallel to the sides of the frame of the cot somehow to extend the bottom of the tarp so it isn’t in constant contact with my face. Just wondering if u had run into this at any point and what your ideas might be. Thanks man!
Yes your idea is a fantastic start! Let me show you how to finish it on a budget… I am not sure if you watched this video: “https://www.youtube.com/watch?v=UQmdzQLMtJc&list=PLOeoLwvtn1UUwpogw5XlJVsMZKrwnH6Gf” but it shows the same concept you mentioned of “connecting some tent pole type rods parallel to the sides of the frame of the cot somehow to extend the bottom of the tarp so it isn’t in constant contact with my face”. You can see a half circle extended above my head (white poles, with a silver middle piece). I went to Home Depot and purchased a reflector for one’s driveway (~$5.00) which is made up of a long fiberglass pole with one end sharpened for staking into the ground and the other end has a circular red reflector on it. Use a hack saw to cut off both ends, sand the tips so you don’t get fiberglass slivers, slot one end of the pole into the tarp bedding parallel with the frame, bend the pole into a U-shape and slide the other end into the opposite side’s bedding sleeve. I hope this makes sense. The extra length/width of your tarp will be the limiting factor as to how big of an extension you can use.
I ended up cutting the pole into two pieces (for portability) and using a small piece of aluminum pipe to hold the ends together. The compression of the bent fiberglass poles holds everything in place and does not require any type of Velcro or specific sleeve system. BUT! My recommendation is to use this technique at the foot end and sleep further away from the head end as this will give a more equal distribution of weight on your cot.
Another idea I had was to drill a hole in the center of the frame at the head and run a small fiberglass pole through it (use a piece of thick tape wrapped around the pole to prevent it from falling through the hole) so that it points straight up. I did not do this out of fear of weakening the frame for an idea that probably wouldn’t work, haha.
Right on man. So, with using the reflector rods, and talking about adding the extra width/ length in your tarp material. Should It work by adding width only or do I need to add L as well?
the easiest option is if you just add length to your portaledge using the rods (they are horizontal with the frame). This would move the tarp angle out from the head thus making the height above your head higher and would only require adding length to the tarp. The cooler but much more difficult option is if you put the rods vertical to hold the tarp higher above your head. I have no idea where to add material for this idea because it would completely change the geometry of the tarp. That means if you did it wrong you will have a lot of loose spots on the tarp. Maybe it is easy, but I haven’t tried it although I really like the idea of having more room at the head so I will likely play with the idea on the portaledge I am currently building.
Hi, from the Netherlands, I find your site very inspiring. And i’m planning to make a double portaledge. And wondering why you do not have used two cot’s?
This would make it more flexible. Camping with my wife or allone. I even fathom if it be possible to make 1 cover that fits a single and a double?
What do you think?
Greeting Jos
I like the idea! If you custom built a frame I think it could be done without any issues. However, using two cots next to each other would prove difficult because they need to be anchored strongly together otherwise the outermost cot will slip under (or over) the inner cot. Building a tarp that will fit a double and a single is a lot easier though. The only problem I can see with the tarp is it will be VERY floppy and noisy in the wind when being used on a single portaledge.
Hi Treefool,
I solved the “fabric in your face” problem with a piece of throw line that is about 1 1/2 times the length of portaledge.
Loop each end around head and foot end of portaledge. Tie an adjustable knot (tautline hitch) in the line between the middle of portaledge and your head (so you can adjust it while lying down. Tie another knot at the foot end (like bowline).
Put the line through the top carabiner. Lie down and slide the adjustable knot to tighten the fabric. You now have No fabric on head or feet! Weight – about 9 grams.
Treehopper
How do you anchor your port a ledge to a tree? what materials do you use and here can I find them?
I usually just bring a 10′ piece of climbing spec webbing and girth hitch it to the branch that I plan to hang the ledge from then tie an overhand on a bite (essentially a waterknot) and clip the portaledge to that. The rest of you question can be found at the bottom of this tutorial page.
How do you hang a port a ledge????(video?)
Girth hitch a piece of webbing to your chosen hanging location then clip your portaledge to it. A 10′ hank of webbing will be plenty.
Hey Logan,
Thought maybe you would know someone interested in a Black Diamond Single portaledge. I’m selling mine, only been used couple times.. Like new condition. Nothing wrong with it. $500 CAD which is around $400 USD
Nope, but you are welcome to leave your email in the comments for other readers who might be interested. You might get spammed though.
Hey,
thanks for sharing this great information. I’d love to order a Gander Mountain Cabin Cot and start building my portaledge, but unfortunately Gander Mountain doesn’t ship to Germany.
Could you tell me the measurements of the parcel in which the Cabin Cot is shipped so that I can try to research shipping options to Germany? Unfortunately I can’t find a similarly designed cabin cot back here…
Anke
I sent you an email.
Hi there – just wondering where the door / entry is and what you use to open and shut it? A zip? Also I didn’t see what you did with the ‘skirt’ overhang of the fly under the bed. I’m attempting to make one for a kayak trip – but with the weight bearing of the webbing straps to be on the bedding fabric rather than the poles – as the poles are a kayak paddle for one length and the backbone part of my inflatable kayak to be the other length, with two carbon fibre poles as seperater poles for the width… looking forward to the challenge of completing it within a month or so 🙂 Have just ordered the fabric – thanks so much for your clear explanations and photos – keep up the great work!!!
Damn! Please send me pictures once your idea is finished. It sounds like you will have a lot of complicated problems to solve before your project is completed. The skirt has a shock cord inside of it that when pulled tight with a cord lock will suck all of the excess fabric against the bottom of the portaledge. This is also the entry point, simply stretch the bottom open, crawl in, and let it spring back into place. There is no need for a door if done this way.
So today I was walking through Bass Pro Shop and saw a camping cot I kinda gave it that tilted head look that a dog gives. I have been looking for a portaledge so when I saw it I immediately saw a lightbulb blinking over my head lol. I kinda shrugged it off and thought no way. After I left I kept thinking about how I could pull this off. I stumbled across this page which has given me some great ideas. Thank you a ton!
My mom has a husqvarna sewing machine; she’s definitely into sewing. So we have been experimenting with sewing my own slings with tubular webbing and finally got it down. I’ll attach some pictures if I can. We kept trying bar tacks but had SO many issues it wasn’t funny. I got a black diamond daisy chain and matched the tack. Her machine sews leather so the thickness wasn’t an issue. I tested it by taking a sling and throwing over my trucks ball hitch and hooking a come along to it and pulling my truck while in park. True test? No. But makes me feel safe enough that I won’t worry twice about it.
Now to the portaledge! My wheels are turning, probably way too much but I’m blaming you for that lol. I am going to build myself a single portaledge now. It may take some time with planning but that’s more not to waste money than anything. I can see how easy the cot design is. I’m still debating the frame but I do think I am going to get a cot for the fabric if nothing else. My goal the next couple weeks is to start looking at the frames to get myself some ideas. Looking at the one you built from gander mtn I like everything but the center section you left in. I think I would rather take the piece you left in (the leg piece) and modify it so it’s flat and still there for that spreader bar effect. I have a buddy that welds so I see a favor being asked. But as for stability of that frame; does it feel sturdy enough to trust on the side of a cliff? Or….. Knowing what you know now and the experience you have under your belt would it be better to modify that frame or just make a frame? Feel free to email me if you’re interested in helping out a fellow crazy man.
(Can’t attach a pic)
Jim, I love it! When you start building your ledge I want you to join http://verticalcamping.com/ and share your project in the “DIY” forum to help inspire others. Thanks!
Hey! Love your work. You got me fired up to sleep in a tree! Can you post a better picture of how you tied into the center sections of your 15 min and Junkyard portaledges? I just made my own 15 minute ledge and was wanting to see how you did that. Thanks! Keep up the good stuff!
Thanks! I had planned to do a video about this last week but my plans got cancelled (being a father is harder than I thought). I will hopefully get the time to upload a bunch of new photos within the month.
Treefool! I love your projects and your videos are very entertaining. I’m in the process of making my own double portaledge using your tutorial with a few differences.Right now I have everything done but the fly but the main thing I’m wondering about now is how tall it should be, so how long my suspension straps should be. Mine is currently about 6’6″ from the middle of the floor to the rigging plate but I am debating on shortening it (mainly to try to cut down on fabric for the fly. If you could give me an estimate of how tall yours is and if you like that height or if you think taller/shorter would be better. I would also really like my fly to be able to be used for rock climbing and tree climbing and I’m wondering if I could make one fly that would work for both.
Thanks!!
Yes, 6’6″ seems quite tall. On my single portaledge it was 3’4″ which was WAY to short and this created a very unstable platform. On my double portaledge the wall-side middle suspension webbing measures 4 feet 6 inches from the tubing up to the bottom of the carabiner. I marked this webbing with a bartack made from orange string so that the height stayed constant no matter how I adjusted the other straps depending on the angle of the tree or rockwall. This helps make sure that the rainfly will fit snug every time. You can see that 4 feet 6 inches works quite well for my size of portaledge in this video: https://youtu.be/mNC5Vy4CM1c
However, if your portaledge is longer you will want to make it slightly taller. I recommend you sleep a night in your portaledge, cook, pee, and get dressed in it just to make sure that you found the appropriate length of webbing before you make your rainfly for it.
If you are making a rainfly for rock climbing it needs to be simple and bombproof since (this is an assumption, I have never climbed a big wall) you will likely not use the fly unless the weather is bad. Since you will experience updrafts while on a mountain the windows will become an issue and just make the rainfly more crazy. I recommend making the windows totally sealable (with a zipper maybe?) to help protect against wind driven rain while rock climbing and yet the windows can be opened for when you are in the forest where it is likely to be more hot and humid. You will definitely need two windows if you are camping in MN during the summer with the rainfly down, haha.
Hi!
If I manage to find someone to bend my tubes for the corner. Would you recommend that over the corner block?
Absolutely, lighter and I would guess it is stronger since the connection point isn’t taking all of the force (i’m not an engineer, just guessing based on my own observations)
Hi. I am fro Germany and I am planning to go tree camping and wall camping in alps. my first question will be; Do you need a cot, or a sunbed that folds towards to the ground.
I found the rain fly method pretty complicated is there a easier way to express?
Thank you very much.
I have not tried any other types of cots but I have seen pictures of other tree climbers using cots of much different designs. And, if you are only going to be using your portaledge for one night you could use a bivy bag instead of a rainfly. This is dangerous though as you could get extremely wet if the weather is very bad.
Hello im interested in buying some corners, i only need one set of four but am willing to purchase two sets if it would help bring the price down or in case there are not enough peeps interested.. Sooner the better, Spring is knockn at the door! O and are there other alloy options? such as titanium?
Sorry, spring is indeed knockin at the door and all I have been doing in my freetime is hanging outside with my family! I hope you found a good alternative.
Thats good to hear man, family time is important. I did figure out a different method for the corners. Im building a larger tree ledge than normal, so i can accommodate my lady and dog as well. Im not sure if you have seen the new D4 ledge by John Middendorf, but it has rounded corners, rather than typical milled aluminum square corners. But i did get a hold of the guy at runoutcustoms and have an order in for some A-5 corner for a single ledge i have planned for the future. Im using 1.25OD chromoly tubes and for the corners im using some DOM tubing with an ID of 1.245 that I will have bent into four elbows to accommodate the main tubes. When i lived on Oahu i started constructing a tree “deck” in a Banyan tree above PipeLine,( surf spot), but never got it finished before i moved back to the pacific nw and has been on my mind ever since. I give you mad props and thank you greatly for being creative and giving all us other tree lovers more ideas as to how to sleep in the trees. My Tree Boat hammock by New tribe is great, but i seriously looking forward to one anchor point rather than 2-4.
Epic! I would love to see the finished product! I have wanted to do a portaledge made from bent elbows as this seems like the lightest possible solution but I was never able to find a local place to bend me some corners that wouldn’t cost more than a new portaledge, haha. I will be patiently waiting for the photos 😉
Are there any areas on your tree ledge that you have noticed significant ware yet? Is there anything little things that you would change or do different? Im going to put the plastic buckles for the bedding underneath. Im getting the elbows bent sometime next week and will post some photos!
Nope. I went SUPER heavy on the durability. The tree-side material has the 400d bedding with a 1000d cover and on top of the cover is a 2 inch wide webbing running the length of the bedding. It would take HUGE amounts of friction to even begin rubbing through that side of the portaledge. I had it smashed against some sharp granite for a night up in Duluth, MN and it was totally unscathed.
Awesome! A night against some sharp granite is a legit test. the elbow below is out of some stainless 1.25 tubing. With a .065 wall. This tree ledge building takes a lot more planning and work than one would think 🙈
how do i post a picture? or is that something you do?
Yup, send me a message with the picture link and I will post it up.
Hello Logan!
I saw in your video “Bat Hammock” and decided to make this myself.
If it’s not difficult, please send to the mail: fred35@rambler.ru photo with the indication of the sizes (in expanded form) and the length of the straps, for more precise manufacturing. (Like sewing belts into a hammock and where they pass).
I would be very grateful.
My Portalege is already manufactured. It will be ready soon.
Very much I ask to throw off a photo or model drawings of this hammock with the sizes.
Thank you for your work and your positive photos.
Sincerely, Vladimir.
Hey Logan,
I love your videos and site! I was interested in making the 15 min portaledge. No more gander cots due to the bankruptcy. Can you recommend another brand you or others have used that is lightweight? Something off amazon perhaps.
Spencer, I hadn’t heard Gander MTN went bankrupt! I honestly searched far and wide for another aluminum cot online but was not able to find much. I haven’t searched in a year or so though. If I were you I would look through the cots on amazon searching specifically for a cot that is not painted (means it is aluminum because steel will rust without paint), a cot that has a full tubing frame with rounded corners (the frame can’t come apart), and make sure the bedding will allow you to tie a piece of webbing around the frame. If I find something I will edit this post.
Hey Tree Fool!
Love your builds! Working on constructing a rain fly for my double port- a -ledge.
In your experience and utilizing the diagram posted way above…what measurements would you suggest for the DOUBLE ledge?
It has been awhile but I think I gave the tarp perimeter 8 extra inches over the perimeter of the ledge. Don’t forget to include seems! That might also be a little too much but id rather have a tarp too big than to small. I used 4.5 feet of height from the ledge to the conjunction of the webbing above, then add 15″ for the skirt and drawstring hem.
Hi, I will try to make myself a double portaledge almost like yours but I didn’t find the information about the witdh of the principal 1” aluminium pole. At my local retailer, I have the option of 0,065” and 0,125”, what do you think about that?
Thanks!
The frame is made out of 1″ steel. If you go with aluminum you need to use 1.125 with the appropriate wall thickness or the frame will bow inwards.
hi treefool, many thanks for your youtube channel, and this really interesting website! I was wondering If you have already seem somebody using PVC instead of aluminium for the portaledge frame?
Yup, but it is not a traditional rectangle. It is a circular portaledge (here is the video: https://www.youtube.com/watch?v=2wZqEZZUA14). This the pvc works because the circular shape is so much stronger than a rectangle. If you tried building a rectangular portaledge out of pvc you would need multiple crossbars to keep the sides from bowing in.
Hi Logan! First want to say that your site has been a total inspiration. I’m actually a licensed guide in New York State for a l’ll sorts of adventures and I’m officially obsessed with learning more about tree camping. Have you seen any of the “ultra light” cots like the ThermaRest cots or the immitation versions on Amazon? I’m wondering if you think something like that could be feasible for a portaledge build of that’s crazy town. On a climbing forum it looked like a reviewer was messing with the idea, but never found much more. Thanks a lot!
I am guessing that “reviewer” was one of the cofounders of mountain project. He had a short video of hanging the Thermarest cot with random pieces of climbing cord. After looking at these cots up close and reading the reviews of all the cracked feet I figured it was too much of a hassel. I have a good friend who is currently building a superlight single person portaledge and he wants to mass manufacture them but I haven’t talked to him for a few months. When he launches them I will be the first to advertise them to the world. Otherwise it is hard to beat the oldschool aluminum cots with bent corners in terms of lightness (they just don’t collapse very well).
Hi Logan!
Thanks again for all the info! Did you use the same approach for your single/stealth portaledge fly? From the photos it sort of looks like there are fewer seams, but you may just be a STITCH NINJA. Thx! -Tim in NYC
They were made the same way. I guess I am a stitch ninja 🙂
Specialist fabric is hard to come by down here in Australia, what do you think about using old scrap yacht sails as the bed?
I don’t see why not! Give it a try and send some photos my way when it is finished.
We’d obviously all be WAY smarter to just buy the Acorn, but if anyone is looking for a cot to start a build I recently found these Rothcos that look pretty good. Multi-piece aluminum frame, 600D nylon bedding, 75″ long, $75 on eBay. Maybe the same design as the original Gander Mtn cot?
https://www.ebay.com/itm/Rothco-Cot-Folding-Aluminium/132992732065?hash=item1ef6fc0ba1:g:NBIAAOSwB7hcjps7
https://www.rothco.com/product/rothco-camp-cot
Congrats on the product launch Logan! The ledge and fly look extremely, uhh, fly.
-Tim in NYC
Thanks Tim! I have been getting asked a lot for cot alternatives but I just don’t have the time to stay up to date with all of the different options so I think your post will be much appreciated by our fellow tree campers.
Hi man,
Great stuff. I would like to give it a go and build my own portaledge and I found your website very helpful.
How long do you suggest to set up the adjustable slings? Maybe I should point out that I would like to try and use it on a big wall for climbing too.
Cheers,
Gideon
Hey Gideon. I found that 5 feet for the wall side center webbing is the perfect height. Match the rest of the webbing to the center webbing until your portaledge is level and this will give you a height that feels stable without causing such a huge vertical footprint that you can’t find a spot to camp.
Hey I was curious if you’ve looked into making a single portaledge out of the Alps Lightweight Cot. Me and some friends are trying to find a much cheaper solution for big walls and there is no Gander Mountain nearby. It seems pretty similar to the cheap one you displayed on here. I’m just slightly worried about the strength of the poles bending where the webbing connects. Here’s a link.
https://www.sportsmans.com/camping-gear-supplies/cots-pads-hammocks/cots/alps-mountaineering-lightweight-camp-cot/p/1212330?gclid=Cj0KCQjw4s7qBRCzARIsAImcAxYlIsVwAxhP0kqoqSMnaWxH1JFCD8omxwcHAuae6xrRuqyVY5KmRd0aAjoJEALw_wcB
Thank you!
I have not used that style of cot to make a cheap protaledge. The webbing will be compressing the “feet” in a way that might make them pop out of the holes on the bottom of the frame. And since, in that cot design, the feet are what keeps the sides of the frame spread apart I think you would be risking spending a night hanging in your harness if you brought them on the wall with you. Test it in your backyard hanging off a tree before you bring it to a big wall and let me know how it goes.
Dude, you rock! Thanks!
Glad I could help!
First things first, thank you for your site !
I just found your site while looking for DIY portaldege after spending some time reading about big wall climbing. I don’t know if I will one day go into big wall but this is really cool to see your work.
Coming from ultralight trekking and hammocking, I was wondering if you tried to use some dyneema braid with whoopie slings (https://www.animatedknots.com/whoopie-sling-knot) for your suspension system, it is quite common in the hammock world and has a huge strength to weight ratio. I don’t plan to make a portaledge tomorrow but if I start one day, I will probably try that (except if you tell me that it doesn’t work).
love it! I don’t use dyneema stuff simply cuz it is so spendy, haha. But I would use it for everything if I had spare cash!