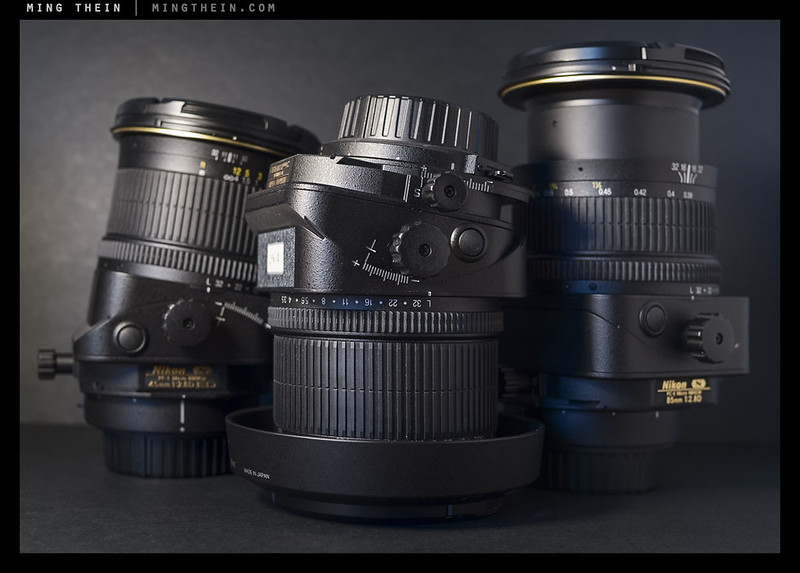
No, they’re not broken. But your wallet will be after buying a set.
One of the most frequent things I get asked about is the use of tilt shift lenses; it isn’t surprising given the apparent complexity of the hardware and lack of any clearly understandable documentation or literature. There are plenty of good technical explanations of movements, but often they leave the reader more confused than when they started especially if you do not have a background in optics! This article will therefore aim to address the whole question of camera movements in as straightforward a manner as possible – necessitating some simplifications. Read on if you’ve ever been bothered by insufficient (or too much) depth of field, or geometric conversion of verticals with a wide angle…
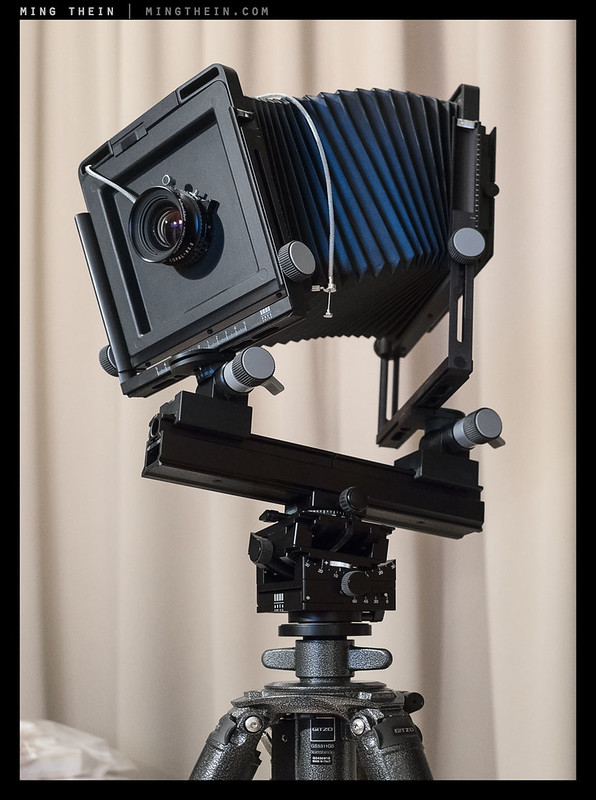
A monorail 4×5″ view camera: the Arca-Swiss F-Line Metric.
To understand movements, a little bit of history is required. Early cameras used long real focal lengths paired with large capture areas (formats) to achieve normal-ish angles of view; simple geometry dictates that the larger the format, the longer the focal length you need to maintain the same angle of view. Depth of field, however, remains a property of a) the real focal length; b) the aperture and c) the distance between camera and subject. Largish apertures were required to obtain sufficient light for viewing, and to keep exposure times short; however this was always at the expense of sufficient depth of field. Smaller formats would render poor image quality due to the film emulsions of the time. Camera makers had two cures for this: firstly, provision of a closable iris (the aperture) to allow for a large viewing aperture but a small capture aperture; secondly, the Scheimpflug principle.
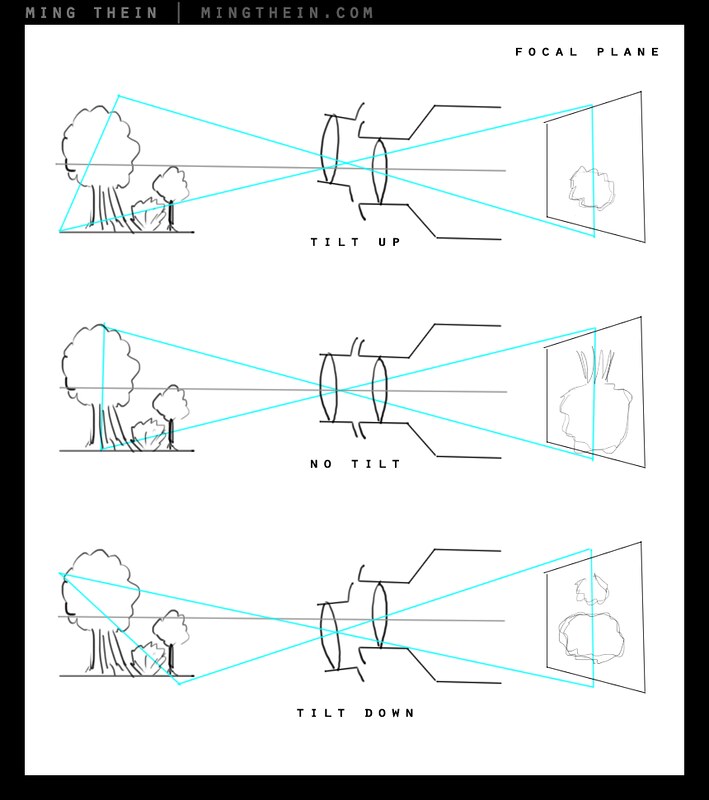
Tilt, extending or reducing depth of field depending on direction, and employing the Scheimpflug principle.
The Scheimpflug principle is a simple geometric rule that relates the plane of focus to the orientation of the camera lens relative to the capture plane. In practical terms, imagine your focal plane like a book-shaped box superposed over your subject: it is effectively flat, and has some thickness. Anything that falls within the box will be in focus. You can increase the thickness of the box by stopping down, but that is only useful up to a point: you will run out of ability to stop down infinitely, and you will start to see degradation in resolution caused by diffraction*.
*Diffraction is a wave effect that causes rays from a point source to spread out inversely proportional to the size of the aperture. Couple this with shrinking photosite sizes, minimum apertures before diffraction is visible (i.e. light spill to adjacent photosites) become larger, limiting effective resolving power/ perceptual depth of field gains on stopping down.
What a tilt allows is the ability to place this focal plane at an angle that isn’t parallel to the imaging plane: you can lie it down, tilt it upwards, or to either side, or some angle in between. The focal plane is still a plane – you cannot make it curve or bend in a complex shape – but you might be able to find a plane that intersects all of your desired subjects and cover the rest by stopping down a little. It therefore makes it easy to get any planar subject entirely in focus without having to resort to very small apertures.
Tilt employed for focal plane to cover entire dial and front roller; this is not a stacked or merged image
The easiest way to think about the resulting movement in the focal plane when you tilt is to imagine it being parallel to the front element: if you tilt the lens down, then the focal plane also moves parallel to this and ‘lies down’. Thus more elements of the scene from near to far will be in focus, increasing apparent depth of field in the image plane. Doing the opposite will reduce depth of field. Note that you may also hear some other terminology mentioned: for the purposes of a DSLR, a swing is a horizontal tilt; however, view cameras usually have both tilt and shift on both the lens plane (front standard) and the image plane (rear standard), which allows for some even more complex manipulations of the focal plane. DSLRs only allow for limited movements in the lens plane, and worse still, tilt and shift axes are almost always coupled.

Tilt employed again to create focal plane that slices through the watch name and the foreground lug/strap
In practice, shorter focal lengths require less tilt to get the same depth of field extension compared to longer ones. I’ve almost never had to use any tilt on the 24PCE simply because there is so much depth of field already by f8. Even wide open, use of a degree or less will render a very clear change in the focal plane – which makes it all the more bizarre that you have eight degrees of tilt, and no real precision in controlling them. Conversely, with the 85PCE, the full eight degrees is often not enough to lie the focal plane down sufficiently – especially when working with close subjects that are mostly flat. There is no choice here but to resort to small apertures coupled with tilt.
In the example (somewhat simplified and also exaggerated) drawing above, you can see that the focal plane remains parallel to the image plane and slices straight through the rear tree when there is no tilt applied (centre). However, if we tilt upwards, the focal plane follows and we take a ‘slice’ diagonally through the rear tree only; if we tilt downwards, then the focal plane ‘lies down’ and transects both the front bush and the rear tree. The front tree will never be in focus in either example because you can see it always lies outside the focal plane. It will be more in focus in the lower (tilt down) situation than the other two.
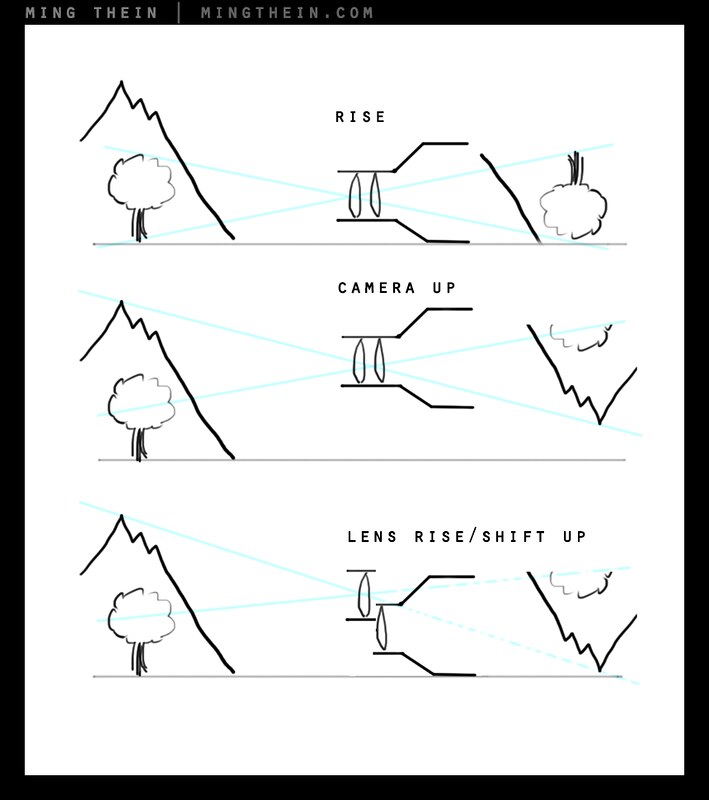
Shift. Or more accurately in this case, rise and fall.
Shift, on the other hand, is a movement of the optical cell in a direction that is still parallel to the imaging plane. Effectively, the imaging plane is now looking at the outer portion of the lens’ imaging circle**. By doing so, we are therefore either looking above or below the effective camera position; you could alternatively imagine the lens as being much wider on a larger format and cropping a portion of the image that’s higher up or lower down, to match the sensor/capture size. Since we are effectively working with a much wider lens, we can keep the camera level – keeping verticals vertical – and still effectively be shooting from a ‘higher’ or ‘lower’ position.
**This is why tilt shift lenses have to be large, and usually relatively slow aperture: they have to maintain adequate optical performance over a much larger image circle than the format would normally require. It is also why lenses from larger formats can generally be adapted to smaller formats with the added possibility of movements.
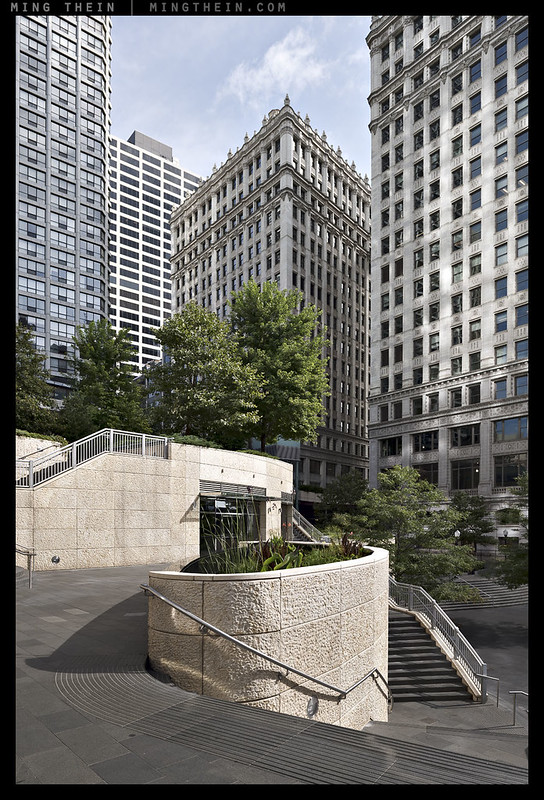
Rise employed to ensure verticals remain vertical
This is the main reason to use a shift lens: it allows you to effectively shoot from a much higher or lower camera position without physically having to change the height of your vantage point. By doing so, geometric distortion caused by converging verticals from aiming the camera upwards is eliminated. Generally, the most common movement used is rise – the lens is raised and the camera is static. (Lowering the lens is of course ‘fall’). Once again, you can imagine the focal plane like a book: except now it stays parallel, but moves upwards or downwards as the lens does the same. If the book moves parallel to the long axis of the format, i.e. horizontally, then this is shift. There are few uses for shift other than flat panoramic stitching – since there is no change in camera position, there are no issues with nodal point, alignment etc. enabling for very easy merging of the left and right portions of the image afterwards. Effectively, you can turn your 24×36 sensor into either something very wide – 24×60 or thereabouts – or stocky – 36×48 or thereabouts. (This of course depends on the amount of shift built into the lens.)
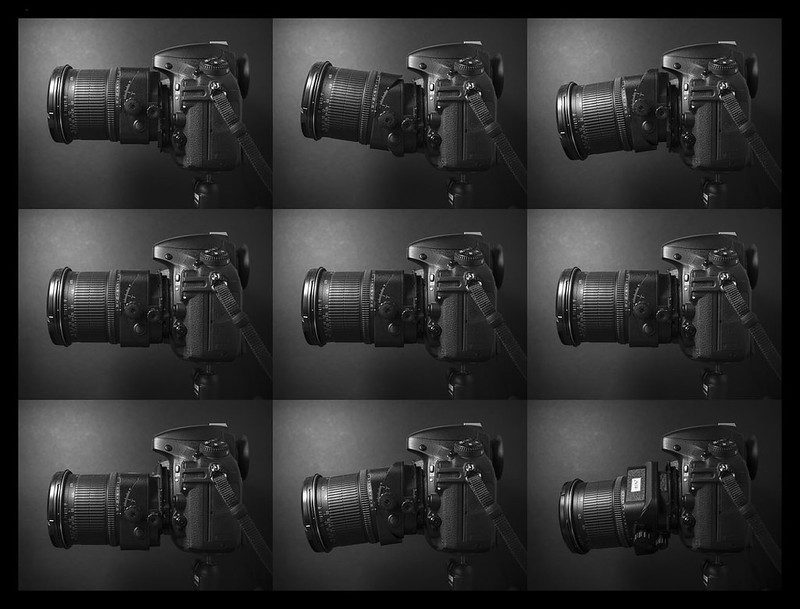
Left column: rise and fall. Centre column: tilt. Right column: compound movements including tilt/rise and tilt/fall/rotate. Centre row: zero position for comparison.
Tilt and shift can of course be combined to effectively say eliminate converging verticals in a building, and still have everything in focus from the foreground gardens to the very back of the roof (combined rise and tilt) or lay the focal plane very carefully to match say an inclined watch face. Unfortunately, few lenses allow for the tilt and shift axes to move independently; all of the Nikon PCEs require factory modification (except the 24) and even then you have to choose whether to have the axes parallel or perpendicular – there are no intermediate orientations. I understand the newer Canon lenses allow for independent rotation of tilt and shift axes, however.
In practical implementation, it can be easy to get confused once you start moving things around – especially if you are trying to match a subject plane that’s inclined at an odd angle, and combining both tilt and shift. My suggestion is to start with rough focus, then decide your shift orientation first and shift the lens – you will have to move the camera quite a bit after this to compensate for the change in perspective. Next, tilt as necessary to match your subject plane. The amount of tilt required varies enormously – for a wide lens, almost none. For a short tele, sometimes more than the 8 degrees offered by the lens. Then only achieve focus and fine tune your composition. Check your intended near and far subjects for focus if tilting. If you get confused or can’t get what you want in focus, re-zero everything and start again. In general, I find that you need more shift/rise/fall when working wide since these are typically used for perspective corrected architecture; with a long lens, you tend to be focusing on details – e.g. product photography – and always use a lot of tilt, but rarely any shift/rise/fall. There are of course exceptions to this.
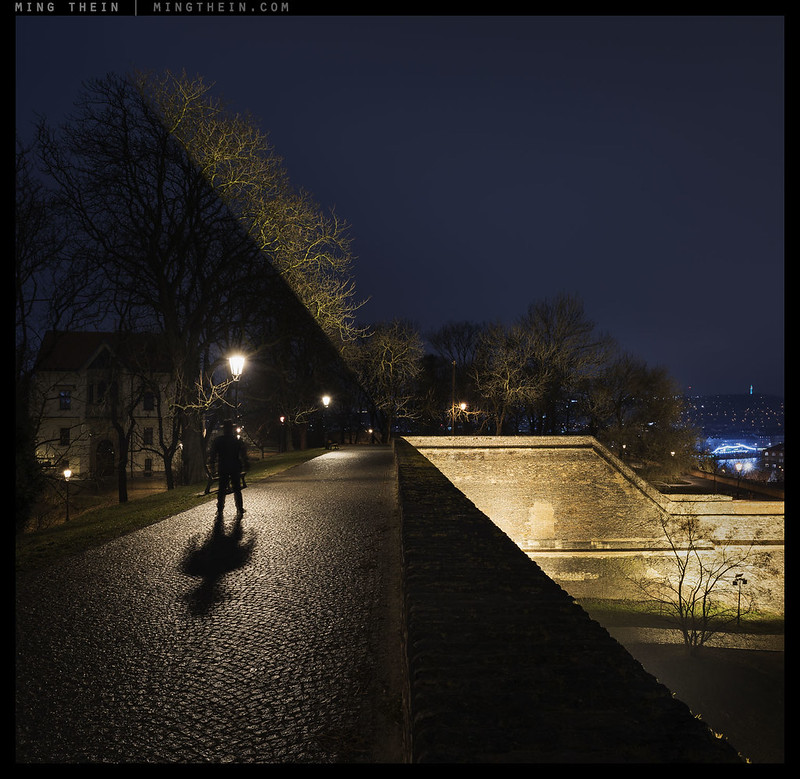 Shift stitch, no tilt, 24PCE. Merged from a left and right (camera vertical)
Remember to lock the tilt and shift knobs to avoid knocking things off; whether after adjustment or in transit. I make a habit of leaving my lenses zeroed to ensure a consistent starting point. You also want to be using live view with magnification if possible – the optical finder is simply not accurate for this kind of work, and your meter is probably also going to be rendered inaccurate because the movements may well result in shading of the metering cell. Though for small perspective corrections you can always straighten the edges using the distort tool in Photoshop, remember that this will also result in image degradation since you are effectively interpolating one edge. The proportions of the subject will also be off because you will have to compensate the non-stretched dimension, too – resulting in further degradation; you may well run into a point where no amount of stretching is going to fix the perspective. On top of that, there is no easy way to replicate tilt – even focus stacking isn’t the same, since you are effectively putting one ‘book of focus’ in front of the other; this doesn’t render the ‘above’ and ‘below’ areas the same way at all.
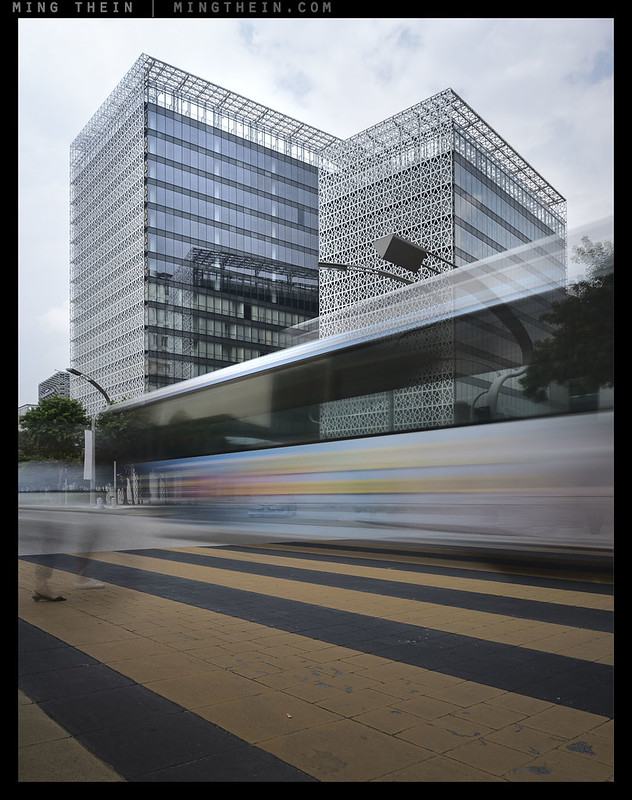
Rise and a small amount of tilt to keep entire image in focus from foreground to background. Not achievable with stacking – there’s no way I could have focus stacked a moving bus…
Beyond the obvious creative freedom, there is one additional reason tilt and shift lenses are going to become an increasingly important part of the photographer’s arsenal: resolution. As sensor density increases, the smallest aperture usable before visible diffraction at the pixel level sets in gets larger and larger. On full frame, with the 12MP cameras, f16 was fine, f22 slightly soft. Go to 24MP and f16 starts to get soft. 36MP, f8-11 is your limit. On the 50MP 5DSR, I’m seeing softening anything beyond f8. This of course defeats the point of having more resolving power; the only way around it is careful management of the focal plane using tilt. Given that you really have to use these cameras on a tripod anyway to maximise image quality, it doesn’t really present much of an additional hardship. Are movements complex? Somewhat. Intimidating? It doesn’t have to be. MT
__________________
Be inspired to take your photography further, including how to master camera movements: Masterclass Tokyo (9-14 Nov) now open for booking!
__________________
Ultraprints from this series are available on request here
__________________
Visit the Teaching Store to up your photographic game – including workshop and Photoshop Workflow videos and the customized Email School of Photography; or go mobile with the Photography Compendium for iPad. You can also get your gear from B&H and Amazon. Prices are the same as normal, however a small portion of your purchase value is referred back to me. Thanks!
Don’t forget to like us on Facebook and join the reader Flickr group!
Images and content copyright Ming Thein | mingthein.com 2012 onwards. All rights reserved






Hi Ming,
I don’t comment here much but I’ve read just about every article/review you’ve ever posted. This is a great site and want to thank you for all the time you spend sharing your knowledge and responding to comments.
I have a question regarding tilt (particularly for macro work); I have a lot of experience with macro work, but never using tilt, so I have been wanting to get into that. My question – are there adapters that allow you to tilt regular lenses (specifically, I use Nikon). Or is this not possible due to image circle constraints? What would you recommend as the most affordable option for tilt and macro work? Or is the only solution pretty much getting the 85 PCE?
Thank you so much.
Matt
Pleasure. Yes, there are adaptors from longer flange distance systems to shorter ones – you need the physical distance, and so system A to system A won’t work (except for Hasselblad’s HTS, but that adds a crop factor). However – not all lenses work well as they may lack the optical corrections unless specifically designed for it (flat field, low CA etc).
Thank you so much, Ming. Adapting to Nikon then would be very hard (unless I used some kind of medium format lens, as you mentioned), but I could easily adapt to my Sony. I’ll look into some options! This might be a good stepping stone before dropping a lot on something like the 85 PCE.
You won’t regret the 85 PCE. It’s painful, but I find it completely indispensable. The 19 PCE is even more painful, but equally irreplaceable when you need it.
I am interested in shift, to the extent that a D850 and 24mm PCE may be my next purchases. This summer I want to rent this lens and a Nikon FX body to gain some experience first.
I shoot mainly architecture, and would like to know whether you have used the 45mm PCE for architecture, and to what extent of success. As a reader I would also be interested on a post dedicated to this subject with your Hasselblad and HTS, although of course I am aware this is not your day job.
You might want to look at the 19 PCE instead – the mechanics and optics are much improved and you don’t run the risk of accidental tilt, plus no more strange field curvature. On the negative side the front element is a hemisphere, so you can’t use filters. I replaced my 24PCE with this recently. The 45 is also excellent, but really depends what angle of view you are looking for – I’ve shot architecture with 300mm too. As for the Hasselblad/ HTS solution – it’s almost always been the H6D-100c, 24mm and HTS; you get the most movement (15mm+)
Ming,
I really enjoy reading your reviews, blog and looking at your images.
I recently bought a canon ts-e 24 mm II with a fotodiox smart adapter on my Sony A7R for urban night-photography.
Before buying I tested the lens on a canon 5dsr ( no intention buying one.) It worked perfectly.
The adapter causes flares in the pictures ( long exposure) I can’t see in live view during composition.
I learned that all adapters have this problem.
Is there a solution to this?
I would really appreciate your advice!
Thanks, Burak
There’s probably light reflecting off something inside the adaptor – a small amount can cause it but still remain invisible during live view. I don’t have a solution other than making sure all internal parts are painted matte black. It could also be something inside the camera itself that’s reflecting incident light at strange angles – remember, the image circle is much larger with TS lenses, so light hits parts of the camera’s internals that might otherwise not be a problem for normal lenses…
Thanks for your answer, did you have this flare problem, when you used a shift lens on Sony a7r II or Nikon during nighttime?
No.
very informative write-up, sifu. thanks. i understand this topic better now.
regards, ken
Do you consider the Nikon PCEs to be optically fine lenses? And how does one go about getting the factory modification to have the tilt and shift functions move independantly? Many thanks for your article Ming.
They’re very good, but not superlative. 8.5-9/10 rather than 10/10, if that helps.
It isn’t possible to have the axes move independently. Service centres can rotate them by 90 to be parallel, but there is no design provision for independent rotation.
Great article as are all of the articles you write. Thank you. I’m shooting a Cambo technical camera, Rodenstock lenses, and a Phase One back. I find a starting point of 1 degree of tilt for every 30mm of the lens, the begin the focusing exercise from there. The challenge of course isn’t as much the near focus as it is having a clear infinity. I rarely exceed f/11, preferring to stay at F/8 or thereabouts whenever possible. I enjoy the mental arguments of tilt as much as I do shooting. Thanks again for a terrific article.
My pleasure!
Regarding mirrorless, A7R use with tilt/shift. It occurs to me that one could use the focus peaking (blinking lights) feature to see if tilt was working. Especially on a flat surface. Focus in the middle of the plane and tilt until one sees the blinking lights, top and bottom of the frame. Stop down to improve focus/blinking. Could be one of the more important features of an EVF and tilt use. As a matter of fact I don’t see how you can make tilt focus easy with an EVF. Zoom in and out, or stay zoomed in on a point in the frame? That would be really time consuming. And tilt focusing with a view camera happened as fast as you could move. But using the blinking lights could make tilt focus a snap in a landscape situation.
What do you think?
That could work actually. I haven’t used tilt with the 7R2 though – I don’t own any tilt lenses that would work properly on it with aperture control.
I’ve always found tilt-shift lenses quite mystifying so this article is very clear and informative – thanks! I’d be curious to know if you’ve tried any of these lenses with your Sony A7R II; would the focus highlighting make it easier to get the most out of the shift function I wonder?
The magnification certainly helps with checking critical focus. I don’t own any of the Canon lenses and the Nikons are fully electronic and cannot adjust aperture without a Nikon body; I’m using the Zeiss 2.8/35 PC Distagon though, which works very well.
Wonderful article. Wonderful comments. Made donation. Keep it up!
Thanks Martin!
“Diffraction is why pinhole cameras work: they use the quantum properties of light bending around the edges of a very small aperture to focus it.”
I disagree with this assertion. The principle of a pinhole camera is described perfectly with ray tracing — and was, in fact, done so before the discovery of quantum mechanics!
As for the discussion above about “quantum” vs. “wave” effects — diffraction is a wave effect, light is waves, and that’s all you need to explain how diffraction affects a photo. The fact that light can also act as a particle isn’t really relevant to describe the *effects* of diffraction unless you are talking about single photon detection, and then your description in the earlier comment of the photon’s probability density distribution (aka wavefunction) is needed to calculate the focal plane detection probability distribution. But, as you of course know, this gives the same answer as the classical non-quantum diffraction calculation in the many-photon limit.
It’s been a while since I last studied this, but I’m fairly sure Young’s experiment involved small apertures and a demonstration of the wave/particle duality of light, which is pretty much quantum mechanics. What I don’t remember clearly is to what extent the same is true/visible for a single slit and out to what slit size – Frauenhofer’s experiment – which also showed spreading and interference of the source beam – and whether that would affect resolving power proportionate to pixel sizes since there is a clear relationship between pixel pitch and the aperture at which diffraction becomes noticeable. And that is probably why I am not a career physicist 🙂
> It’s been a while since I last studied this, but I’m fairly sure Young’s experiment involved small apertures and a demonstration of the wave/particle duality of light
Not really. Young’s original double slit interference experiment predated the first inklings of quantum mechanics by almost 100 years and can be (and was originally!) explained purely in terms of classical fields — it works even if h-bar is zero. And the same is true for single slit/single aperture diffraction — Fraunhofer and Fresnel diffraction can be fully explained mathematically without resorting to quantum mechanics (in the case of Fraunhofer diffraction, it’s particularly simple: the intensity pattern on the image plane is simply the square of the Fourier transform of the electric field distribution at the aperture).
The quantum weirdness comes in when you fire single photons at your double (or single) slit — the classical expectation is that particles would not produce interference or diffraction effects — but in fact, you do, as over time you build up a pattern of detected particles that replicates the classical intensity diffraction pattern.
And of course this happens not just with photons but with other particles as well (neutrons are particularly well suited due to not having charge and were one of the first demonstrations of particles behaving like waves). Diffraction is fundamentally a wave phenomenon (not a quantum phenomenon), which is why these sorts of experiments with quantum particles are used as evidence of their wavelike nature.
(FWIW, I was a physicist up until about a year and a half ago)
I stand corrected then 🙂
Always been interested in these lenses. Thanks Ming…any experience with any of the Rockinon/Samyang versions?
I reviewed the Rokinon 24 here some time back. Put it this way: you get what you pay for.
MIng
I’ve enjoyed reading your blog for some time now and I thought it was time to say thank you for the good work. Having moved from large format to dslr I seem to always read the tilt/shift lens focus explanations with interest. Takes me back to the good old days I guess. Your post pointed out the use of shift and the ability to stay put with tripod to add (usually up) to the visualized frame. An excellent piece of very practical advice. I never move more than a couple inches from my chosen camera position. You also pointed out that with a wider angle lens you diminish the need for shift. (I always had a 150mm lens on the Linhof so I used shift a lot to gain more image area and maintain perspective. I always kept the film back in the vertical position and used on axis lens tilt). But your point is well taken. Which brings up that you make the point of needing more lens coverage with movements. Nice.
Here’s where I get on the explanation stump. When I focused with a view (Linhoff 4) camera I almost always used this simple methodology. Not having used a tilt/shift lens on a dslr I don’t know if it applies.
First- imagine a landscape scene with a foreground boulder 4 feet away extending to a high mountain a few miles away.
Second- with camera/film back vertical focus on foreground/near boulder
Third- looking at the ground glass tilt lens until top of the mountain comes into focus
Four- looking at the ground glass, take the front focus knob and turn, watching the focus move down the mountain. (Crank focus wildly so this effect can be seen easily on the glass). Move focus down to one third from top of frame. Depth of focus extends third above this focus plane/line and two- thirds below.
Five- Stop down to f22-32 and bracket three exposures.
If one were still confused I used/explained. (And don’t care about aperture)
Focus near- mark (with a pencil) this point on the rail (read the mark on the Linhof) or bed
Focus far- mark this point on the rail or bed.
Move rail to the midway point between these two points. Stop down and bracket three exposures.
With both methods I never, never worried about diffraction. My proof of the method was always how the print 30×40 inch print looked from two inch viewing distance.
Sorry for the lecture. I always tend toward straightforward (which I need) explanations. So here’s another thank you for keeping it simple.
Claude Fiddler
I agree for view cameras, but it doesn’t quite work the same way if you are shooting with a lens that has the equivalent of front movements only, optical/movement axes that don’t necessarily coincide and no way to make reference marks on the focusing rail. You *will* see noticeable softening and resolution loss at f22 – even f16 – with the current batch of digital sensors, so you do have to care about aperture and diffraction now. It’s one of the reasons tilt becomes useful so you don’t have to stop down as far for the same effective DOF.
Thanks Ming. As you know I’ve recently started using shift and look forward to trying tilt. Your article helps. Take care.
No problem – tilt with a wide is not that useful; 1deg is enough to see some pretty noticeable effects already. Enough that you should be very careful to ensure the tilt axis is locked at zero to avoid unintentional effects…
Yes, thanks for the heads up about locking tilt!
Great article Ming! Can I use some of those great tilt-shift lenses on my A7RII?
Yes so long as they have mechanical diaphragms, or you’re using Canon and a smart adaptor. There is no way to make the Nikon PCE apertures activate sadly.
Thank you for the article. It is a pleasure to read and your pictures are just amazing. I have a tiny correction though. Diffraction is not a quantum effect. It is a wave effect. Any wave diffracts: electromagnetic, acoustic, surface wave, etc. It has nothing to do with quantumness since there is no ħ anywhere in this effect. Also it seems to me that without the diffraction a pinhole camera would work even better 🙂
True, but the wave-particle duality properties of light *are* a quantum effect. Photons have a probability wave function and that is what causes diffraction around small apertures.
Well, this wave-particle duality is a bit more tricky thing. Diffraction of light follows simply from a solution of Maxwell’s equations which were discovered by Maxwell long time before people started to suspect that there should be a quantum mechanics. One can say that light (electromagnetic wave) is a wave by “default”. Due to quantum theory and the wave-particle duality it may have particle properties. Namely it can be emitted or absorbed only in discrete pieces (photons) like a particle would do. This is a quantum effect for light (energy of the light particles contains ħ). On the other hand, there is a real particle like an electron or a tennis ball. Due to wave-particle duality it may have wave properties because it has a wave length (again, it is proportional to ħ). So a tennis ball can diffract when it flies through a window and this is a quantum effect because it disappears if we set ħ to zero 🙂
True – the terminology is at least partially to blame seeing as this probably isn’t the right forum to present equations…
My wife:” how can you read these things early in the morning?!” 🙂 To me it was a good breakfast companion, thank you for the interesting post Ming!
No problem. Mine usually asks how I can write them so early 🙂
For architectural photography on 35mm film I regularly used a 28mm shift lens (and on 6×7 a 75mm lens that required its own Sherpa). However, I do not use one with digital, because there seems to be a fundamental incompatibility in work flow.
The problem is with the lens-correction software for the Raw conversion. To correct, we need the lens axis to intersect the centre of the image field, otherwise we lose symmetry. In principle we could pad out the image to force this, but (in Photoshop) only with the ‘canvas’ adjustment after conversion. And there seems no sensible way to convert the elliptical symmetry from tilt to circular symmetry. So it seems that we lose all the lens-correction facilities for the sake of achieving the movements.
Clearly the type of subject affects the trade-off. For achieving precise geometry in formal architectural subjects it seems that geometrical correction as part of Raw conversion is preferable, especially with the very decent fixed-axis wide lenses that are available; I normally use DxO Optics Pro in preference to Camera Raw unless the across-image grading tools of Camera Raw are needed. Shift-tilt lenses clearly are essential for images such as the watches, where control of defocus has to be the primary object.
So, given your concern with work-flow management, how do you handle what seems to me to be an inherent conflict? Or am I missing something?
Given that photography is all a representation, I tend not to worry too much so long as it looks acceptable. It’s possible to drive yourself mad with all manner of lens corrections/adjustments/projection concerns otherwise 🙂
OMG… Thank you, Ming. I’ve had an interest in TS lenses and how to use them ever since first learning about them on your site. This certainly gives me a better understanding of the how’s and why’s. Now the task will be to see how to adapt a TS lens to one of my X-T1’s. Shouldn’t be too hard. It’ll definitely make playing around Petronas a lot more fun than it already is. Nice that you thought to include this article for us to learn from and take some of the apprehension out of getting started… Looks like yet another trip to see my friends at YL Camera will be in order after the obligatory visa run 🙂
Pretty easy for smaller sensors – there are a lot of TS adaptors (of varying quality) that you can use with larger format (i.e. legacy FF) lenses that will give you ample movements with not that much additional cost…
Ming,
This is definitely an extremely useful article. Thanks!
You’ve mentioned a few times that Nikon PC-E’s cannot tilt and rise at the same time? Or was it that they cannot tilt and rise in different directions/axis’? A little confused on that bit as I’ve only used tilt or rise at any given time and never both together yet.
Pleasure. The PCEs cannot shift/tilt in independent orientations; they are permanently locked at 90 deg to each other or parallel (depending on whether you had it converted or not). In all fairness, the number of situations in which I’ve needed to deploy both simultaneously is very, very few. You tend to be covered by DOF for wider lenses and shift becomes more critical; the other way around for longer.
This is a very practical and useful article Ming. As you know, an area I’m looking to get my teeth into. It’s a pity that lens manufacturers (other than Nikon and Canon) have not brought these lenses up to date for 35mm photography. I wish Zeiss would release a PC-Distagon with updated optics.
I have bought both the Leica (Schneider) 2.8/28 PC-Super-Angulon-R and Zeiss (C/Y) 2.8/35 PC-Distagon, and the relevant adaptors for the Leica M. I’m guessing one of these two will eventually go (possibly the Leica/Schneider but it is a preferred FL), and neither is optimised for digital photography.
Your diagrams showing what happens are really good Ming. A PDF I found when researching the Leica lens had a series of three photos I also found useful, demonstrating the effect of shift for architectural converging lines. As a simple demonstration I found it really useful when getting my head around it –
Click to access First%20Impressions28.pdf
Thanks Linden. The 35 PC is pretty good actually – it holds up even on the 5DSR, but mount quality/planarity are extremely critical to getting a good result.
The problem is I suspect the market for these things is vanishingly small, though given the diffraction/DOF tradeoff with higher resolution sensors, something that might be growing in the near future…
Exactly. It was something I had not previously considered, but the examples you show where ‘infinite’ DOF has been employed creatively will be of increasing interest to photographers fighting the diffraction limits of the ever shrinking diffraction limits of high res sensors.
I had imagined the US market for landscape photography would have created enough of a niche for a lens maker (like Zeiss), but they’d know far better than me.
I hope it happens.
One thing to note: when using movements, you should disable electronic front curtain shutter, because when the camera doesn’t know where the entrance pupil is it can’t compensate for the physical rear curtain being not exactly at the sensor unlike the electronic front curtain; you may end up with uneven exposures at high shutter speeds should you need them (~1/1000 and up).
I’ve always used EFC but can’t say I’ve ever noticed this…